Advising and Enrollment Information
Advising and Enrollment at MSU:
After completing the New Student Orientation online D2L (Desire2Learn) experience course, students will be referred to connect with an academic advisor or College by appointment to initiate the advising and enrollment process. College advisors—rather than the NSO office—will reach out directly to schedule advising appointments and communicate class enrollment procedures. Patience is appreciated while waiting to receive an email regarding the scheduling of an advising appointment after finishing the NSO D2L course.
The following information about advising and enrollment will be helpful when connecting with an advisor, discussing the upcoming semester, and beginning the enrollment process for the first semester of classes.
Note: An NSO hold will be placed on all new students’ accounts during the Orientation process. This hold will be removed by the academic advisor after attending the advising appointment.
Class Enrollment Tutorial Video
All new students must complete the NSO D2L course and schedule their advising appointment before beginning the enrollment process. Since advising and enrollment occur in succession, completing the NSO D2L content as soon as possible is essential for effective preparation for the meeting with an academic advisor or College. Advisors look forward to connecting with students to schedule advising appointments and initiate the enrollment process.
NOTE: It is important to note that the Office of New Student Orientation does not have information regarding advising appointments or when a College or advisor will contact an individual student. All questions related to advising and enrollment should be directed to the respective advisor or College. Again, patience is appreciated while waiting to receive an email regarding the scheduling of an advising appointment after finishing the NSO D2L course.
To Enroll in Your Courses:
Step 1: Access the Student Information System at student.msu.edu
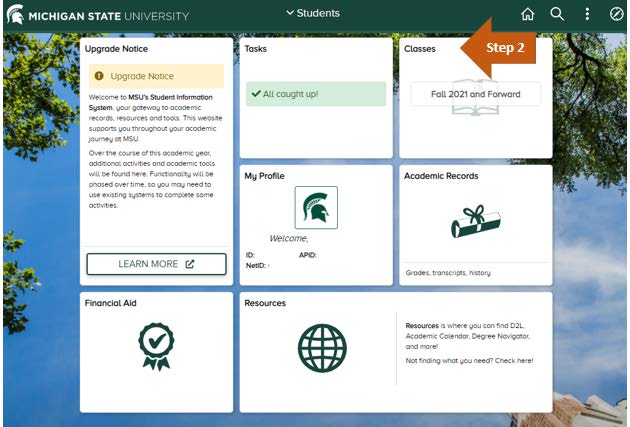
Step 2: Click on the “Classes” tile from the dashboard options. You will then be able to enroll in classes for the next semester.
Note: An intentional NSO hold has been placed on your account that will prevent you from enrolling in classes. Your academic advisor will remove the hold once you have scheduled and attended your advising appointment.

Before Enrolling in Your Courses – Review the Following Links:
Step 1: Go to the Enrollment Information website.
Step 2: Scroll down to “Class Search, Shopping Cart and Enrollment”:
Step 3: Click the “Help Videos” drop down menu
- Review the “Class Search and Shopping Cart” Tutorial recording
- Review the “Enrollment” Tutorial recording
Step 4: Click the “Student Guides” drop down menu
- Review Class Search Quick Guide
- Review Add Course to Shopping Cart
- Review Enrollment
- Review Class Search and Enroll
- Review Drop Classes
- Review Enroll by My Requirements
- Review Enroll from Shopping Cart
- Review Swap Classes
Before Enrolling in Your Courses – Use the “Validation” Feature:
Prior enrolling in courses, it is recommended that classes are added to the Shopping Cart and are “validated” to confirm you are ready to enroll.
The validation will check for prerequisites and alert you to any approvals that are needed, time conflicts and list any holds that would prevent enrollment. Then, when it is time for enrollment, you will be ready to do so with ease. If you need additional support, please refer to the Student Support website for Technical Support, Logging in and Navigation, and more.
To Access Your Class Schedule Once Enrolled:
After you meet with your Academic Advisor to plan your schedule and successfully enrolled in courses, you can access your class schedule, also known as the Academic Progress Plan (APP). Follow the steps below to view your upcoming class schedule using your MSU Student Dashboard.
Step 1: Login at https://student.msu.edu
Step 2: Select the “Classes” tile from the dashboard options

Step 3: Select “View My Classes/Schedule” on navigation bar on far left.
Step 4: All courses that you registered for will be available for viewing. Courses will only appear once you have enrolled/registered for the classes.

